February 2022 Kylie's International Blog Highlights Contest
It's time for the next challenge in Kylie's International Blog Highlights where the theme is "Thank You", and projects voted in the top 10 go on to participate in Kylie's Winners Highlights Hop later in the month.
Project Recipe:
Cut basic white card stock 5 1/2 x 8 1/2 and score at 4 1/4
Cut Designer Series Paper 4 x 5 1/4 , tear around 1/3 mark
Adhere Designer Series Paper to Card base leaving a gap between to stamp the sentiment
Stamp the sentiment
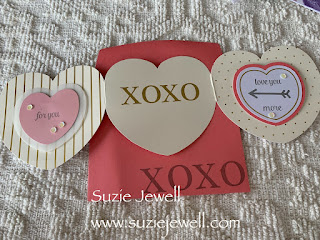
fussy cut hearts from the Designer Series Paper
Add a fancy bow
The January Paper Pumpkin Kit celebrates anniversaries, Valentine's Day, weddings, and all the love occasions and holidays.
The Kisses & Hugs Paper Pumpkin Kit will help you express love with fun heart-shaped cards.
Not familiar with Paper Pumpkin? Check out all the details Here.
The January Paper Pumpkin Kit celebrates anniversaries, Valentine's Day, weddings, and all the love occasions and holidays.
The Kisses & Hugs Paper Pumpkin Kit will help you express love with fun heart-shaped cards.
Not familiar with Paper Pumpkin? Check out all the details Here.
Project Recipe:
Cut your cards stock
Cutting Measurements:
Evening Evergreen CS: 5-1/2” x 7-1/2”, scored in landscape position at 4-1/4” for a top fold card. 1-1/2” x 2” to cut grass. Designer Paper: 3” x 5-1/4”. Fence: 2” x 4”
White CS: 4” x 5-1/4” for inside card.Die cut the fence and the grass.
Stamp the sentiment to the inside basic white.
Adhere the Designer Series paper to the front and the inside basic white with tombow glue
Add a curve to the fence using the bone tool and adhere it to the front.
Adhere the stone gems around the fence.
Demonstrator Training Blog Hop featuring Catching Butterflies
Thank you for joining us for our Stampin' Up!® Demonstrator Training Program Monthly Blog Hop! We are so happy that you could join us today for this blog hop for ideas and creative inspiration. We are a group of Stampin' Up!® Demonstrators from around the world that are taking part in training that is helping us to build a successful Stampin' Up!® business and reach some goals we have set. We really appreciate your support.
You may be starting here or have come from another blog - either way you can find the link list at the bottom of this post so that you can see every blog post and idea today.
The idea for this card came from a card layout I saw somewhere, I don’t remember where. I I had to create a card for our team blog using Sale A-Bration products and this stamp set Catching Butterflies paired with the Sweet Talk Designer Series Paper spoke to me. I found th trick to designing is to find a layout you like, pick the stamps and pair with DSP or dies and there you have inspiration! It really is that easy with Stampin’ Up!
Thanks so much for stopping by today!
As mentioned at the top, this is a blog hop so make sure you 'hop' around to all the amazing projects on this hop! Click on the links below to visit them.
Blog Hop Links
/>
Product List


